初始配置
直接注册最低配置的就ok了,这里不再赘述如何注册Oracle Cloud以及开设Compute Instance。
先点进目标实例,然后点进目标子网,再在安全列表内点进默认的那个安全列表,添加符合如下信息的入站规则:
源CIDR 0.0.0.0/0 – 所有协议这样就直接开放了全部端口,也可以根据需要选择只开放使用的入站端口(TCP协议),再开放全部的ICMP协议,这里还是看个人需求取舍。直接用上面给出的规则是最暴力的解决办法。
现在可以使用创建实例时的SSH密钥连接VPS了。默认用户应该是opc。
先获得权限
sudo -i接下来可以直接升级,也可以不升级:
dnf update -y然后可以装一些别的东西:
dnf install curl gcc openssl-devel bzip2-devel libffi-devel zlib-devel wget make -y参考宝塔纯净版的文档,安装纯净版宝塔:
yum install -y wget && wget -O install.sh http://v7.hostcli.com/install/install_6.0.sh && sh install.sh安装完毕会提示以下内容:
==================================================================

外网面板地址: http://你的公网IP:8888/随机代码
内网面板地址: http://10.0.0.166:8888/随机代码
username: 你的用户名
password: 你的密码
If you cannot access the panel,
release the following panel port [8888] in the security group

若无法访问面板,请检查防火墙/安全组是否有放行面板[8888]端口

==================================================================
如果没看到上面的消息,也可以用下面的指令再次显示你的相关信息:
sudo /etc/init.d/bt default进入宝塔后会提示你安装一些软件,根据需要安装即可,我是直接全部安装了,php选的7.2版本。
全部安装完成后,记得更改默认端口(宝塔、TCP、SSH、phpMyAdmin等的端口),如果在第一步没有开放全部的端口,记得增加新的端口入站规则。
安装Yunzai Bot v3
配置环境
安装环境:
yum install -y libtool automake autoconf gcc-c++ openssl-devel安装node18:
wget https://nodejs.org/dist/v18.14.2/node-v18.14.2-linux-x64.tar.xz
tar -xvf node-v18.14.2-linux-x64.tar.xz
mv node-v18.14.2-linux-x64 node18
chmod 777 node18
vim /etc/profile在弹出的vim窗口按i进入编辑模式,在末尾加上如下内容,加完之后Esc推出编辑模式,然后:wq回车保存退出。
export NODE_HOME=/root/node18

export PATH=$NODE_HOME/bin:$PATH
source /etc/profile可以通过 node -v 和 npm -v 判断是否成功安装。
然后安装pnpm和cnpm:
npm install -g pnpm
npm install -g cnpm
安装软件源与git:
yum install -y epel-release
yum install git
安装chromium:
解决方案来自superuser,首先新建文件:
vim /etc/yum.repos.d/google-chrome.repo在vim编辑器中新增如下内容:
[google-chrome]
name=google-chrome
baseurl=http://dl.google.com/linux/chrome/rpm/stable/x86_64
gpgkey=https://dl.google.com/linux/linux_signing_key.pub
gpgcheck=1
enabled=1
依旧是编辑完成后:wq保存退出,然后执行以下指令就可以成功安装chromium了:
sudo yum install google-chrome安装字体(可选):
yum groupinstall fonts -y然后进入宝塔,安装redis和PM2,如图:

通过宝塔安装的redis安装完毕后会自动运行,我们只要确认PM2里的node版本是刚刚我们安装的18.14.2就好,如图:

正式安装
先返回root根目录
cd克隆仓库:
git clone --depth 1 -b main https://gitee.com/Le-niao/Yunzai-Bot.git如果失败,请尝试:
git clone --depth 1 -b main http://gitee.com/Le-niao/Yunzai-Bot.git克隆完成后打开目标文件夹并且安装依赖:
cd /root/Yunzai-Bot/
pnpm install -P
之后就可以运行了:
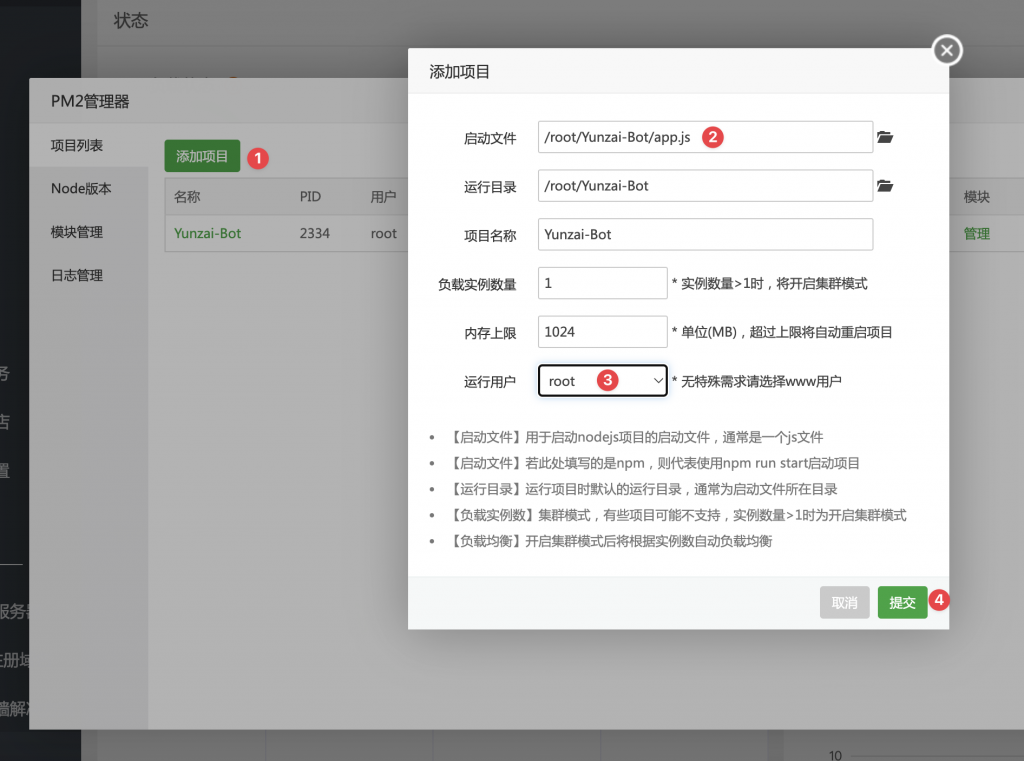
node app可以在命令行下通过Ctrl+C停止运行。后续我们也可以用PM2管理项目运行,如图添加:

这样一来我们就成功安装上了。
接下来是运行node app后常见的问题解法,实际上大部分官方文档里都有,我就遇到了一个问题:
登陆QQ失败解决方案
解决方法如下,来自这个文档:
- 在自己的常用电脑上下载这个文件:QQ验证v1.0.4.zip
- 解压,运行
密码登录.exe - 根据程序提示,输入自己小号的账号和密码
- 如果遇到验证码,请选择扫码验证(要用手机登录小号的 QQ 扫码哦)(放大后如果二维码消失的话,可以在目录里找到
qrcode.png打开来扫) - 检查目录,会发现会多出一个QQ号文件夹`
- 把整个文件夹复制到
Yunzai-bot/data里,替换掉原来的文件夹就行(这个操作可以通过宝塔完成,很方便)
登陆过程中可能还需要安装一个滑动验证码app.apk,链接在命令行里就有,如果挂了,可以从这里下载,使用很明了。
然后就可以愉快的使用啦!接下来是一些插件的安装方法。
安装插件
安装喵喵插件、锅巴插件与图鉴插件:
git clone --depth 1 -b master https://gitee.com/yoimiya-kokomi/miao-plugin.git ./plugins/miao-plugin/

pnpm add image-size -w


git clone --depth=1 https://gitee.com/guoba-yunzai/guoba-plugin.git ./plugins/Guoba-Plugin/

pnpm install --no-lockfile --filter=guoba-plugin -w


git clone --depth=1 https://gitee.com/Ctrlcvs/xiaoyao-cvs-plugin.git ./plugins/xiaoyao-cvs-plugin/

pnpm add promise-retry -w` 再 `pnpm add superagent -w锅巴插件的默认端口是50831,记得去宝塔里放行这个端口(安全里面),如果先前不是放开全部规则的,也记得在Oracle Cloud里放行这个端口。不同插件使用详细请见他们各自的仓库~
安装TRSS 插件 (TRSS-Plugin):
由于TRSS插件需要python3.10,我们这边先安装python3.10,安装步骤如下,来自How to Install Python 3.10 on Oracle Linux 8 | Atlantic.Net:
在Oracle Linux8上安装python3.10
切换回根目录
cd访问 Python官方下载页面并使用以下命令下载最新版本的3.10.9的Python:
wget https://www.python.org/ftp/python/3.10.9/Python-3.10.9.tgz 下载完成后解压缩包:
tar -xf Python-3.10.9.tgz 切换到解压后的目录
cd Python-3.10.9配置python
./configure --enable-optimizations启动build进程:
make -j 2
nproc
安装Python
make altinstall成功安装后可以使用以下命令验证安装是否成功:
python3.10 --version如果不成功,记得在/etc/profile添加环境变量,这里不再赘述前面讲过如何添加,只提供需要添加到最后的内容,记得在保存退出后重新索引:
export PATH="/usr/local/bin:$PATH"接下来是扩展内容,不需要操作,就不翻译了。
Python provides a venv module that helps developers to create a virtual environment and deploy applications easily in an isolated environment.
To create a virtual environment named python-env, run the following command:
python3.10 -m venv python-envNext, activate the virtual environment using the following command:
source python-env/bin/activateYou will get the following shell:
(python-env) [root@oraclelinux8 ~]#Now, you can use the PIP package manager to install any package and dependencies inside your virtual environment.
For example, run the following command to install apache-airflow:
pip3.10 install apache-airflowIf you want to remove this package, run the command below:
pip3.10 uninstall apache-airflowTo exit from the Python virtual environment, run the following command:
deactivate用同样的方法也可以安装任何版本的python,只需要把3.10.9改成你想要的版本号即可。
安装其他环境与插件
安装poetry,官方提供的指令是:
curl -sSL https://install.python-poetry.org | python3 -如果不成功,可以尝试:
curl -sSL https://install.python-poetry.org | python3.10 -成功后切换回Yunzai Bot的目录:
cd /root/Yunzai-Bot克隆与安装
git clone --depth 1 https://Yunzai.TRSS.me plugins/TRSS-Plugin

pnpm i
接下来是可选项,如果想要使用这个插件的 图片修复 | 图片背景去除 | 语音合成 功能。
poetry install直接安装,然后会发现卡在安装torch了,于是尝试使用pip安装,结果依然卡在最后,后来去查了一下,原来是RAM不够,于是可以这样安装。
pip3.10 install torch --no-cache-dir既然装好了torch,那我们继续使用poetry安装..
poetry install还是报错,这回是Timeout了,先搁置吧..
安装光遇插件 (Tlon-Sky),清凉图插件 (yunzai-c-v-plugin)与ChatGPT问答插件(chatgpt-plugin)
cd /root/Yunzai-Bot


git clone --depth=1 https://gitee.com/Tloml-Starry/Tlon-Sky.git ./plugins/Tlon-Sky/


git clone --depth=1 https://gitee.com/xwy231321/yunzai-c-v-plugin.git ./plugins/yunzai-c-v-plugin/


git clone --depth=1 https://github.com/ikechan8370/chatgpt-plugin.git ./plugins/chatgpt-plugin/

cd plugins/chatgpt-plugin

pnpm i
修改ChatGPT插件配置:复制plugins/chatgpt-plugin/config/config.example.js并将其改名为config.js 编辑plugins/chatgpt-plugin/config/config.js文件,根据其中的注释修改必要配置项。
最后重启Yunzai Bot,大功告成。
图库
git clone --depth=1 https://github.com/lc-hongdou/gallery.git ./plugins/miao-plugin/resources/profile/normal-character/gallery
git clone --depth=1 https://github.com/lc-hongdou/shui.git ./plugins/miao-plugin/resources/profile/normal-character/shui
git clone --depth=1 https://github.com/lc-hongdou/huo.git ./plugins/miao-plugin/resources/profile/normal-character/huo
git clone --depth=1 https://github.com/lc-hongdou/bing.git ./plugins/miao-plugin/resources/profile/normal-character/bing
git clone --depth=1 https://github.com/lc-hongdou/lei.git ./plugins/miao-plugin/resources/profile/normal-character/lei
git clone --depth=1 https://github.com/lc-hongdou/yan.git ./plugins/miao-plugin/resources/profile/normal-character/yan
git clone --depth=1 https://github.com/lc-hongdou/cao.git ./plugins/miao-plugin/resources/profile/normal-character/cao
git clone --depth=1 https://github.com/lc-hongdou/feng.git ./plugins/miao-plugin/resources/profile/normal-character/feng
相关更新
相关更新:云崽相关补充 – 星笙月煜 (iocky.com)

